The Florida DrupalCamp website (where session submissions are open till December 19th), uses the ECA module to send transactional emails. In part 1 of this series, I walk through using ECA to send an email when a user creates a “session” node. If you’ve not read that article yet, check it out now as it gives a good background of ECA.
In this next article, I’ll walk through the steps of sending confirmation and rejection emails when a field is changed to indicate the session is accepted or rejected. We’ll also display a confirmation message to the user that emails have been sent out.
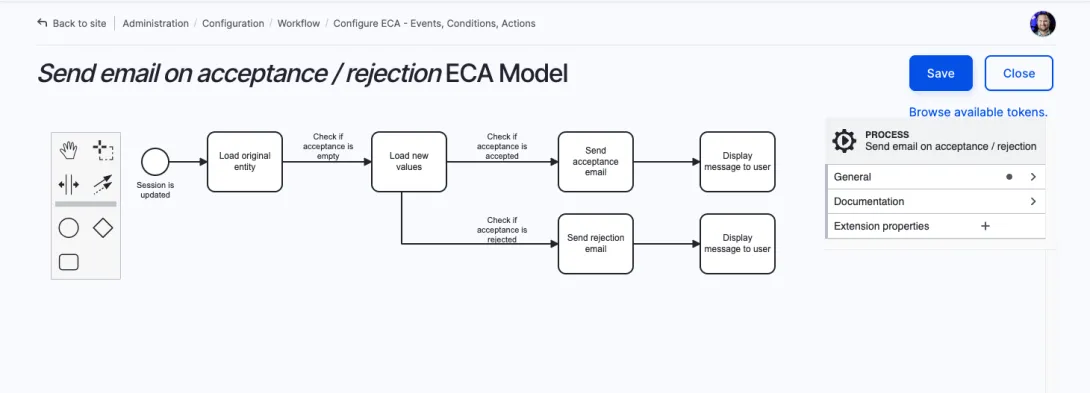
FLDC site architecture
The Florida DrupalCamp website has a node type called session. Along with the normal expected fields, there’s an optional “Acceptance” field (field_acceptance) that’s a reference to a taxonomy vocabulary where there are two entries: “Accepted”, and “Rejected”.
I have the following ECA related modules installed and enabled:
eca- this is the core moduleeca_content- this enables ECA to work with content entities (like creation, updating, etc)eca_ui- This is a UI to see (but not configure) existing ECA modals.bpmn_io- This is the UI to create and configure models
Where we’re going
To give you an idea of where we’re ending up, here’s a screenshot of the final model within ECA.
1. Navigate to ECA
The first step is to navigate to Admin > Configuration > Workflow > ECA. You’ll see a list of your current models (below we see the one that we create in step 1 of this series). Click on the “Add new model” button at the top right and then give the model a name (we name this "Send email on acceptance / rejection").
2. Create the start event
To start, we need to create an event to trigger the ECA workflow.
- Drag the “Create Start Event” circle from the left toolbar to the canvas.
- Within the properties pane on the right hand side, click the “Select” button within the “Template” section.
- A modal appears. Choose the option for “Update content entity”.
- Change the type of this entity to “Content: Session” (“Session” is the name of our content type that updating will trigger this model).
- Give this event a name. We call ours, “Session is updated”.
3. Append the “Load original entity” task
The next step is that we need to load the entity without its modified fields. We’ll then give this entity a token name so we can reference it later.
- Click the start event circle. You’ll see some icons appear to the right of it. Click the rounded rectangle “Append task” icon, which inserts a task.
- Label the task “Load original entity”.
- In the “Template” section, Click the “Select” button and choose “Entity: load”.
- In the “Custom properties” section, change the “Name of token” field to
originalentity. We’ll be referencing this later, so watch for typos! - Near the bottom, change the option for “Load unchanged values” to
yes.
4. Append another task: “Load new values”
We also need another task to load the entity with its new values (so we can compare). We’ll chain this task off of the previous one.
* Note that I'm being explicit very here. While graciously reviewing this, maintainer Jürgen Haas noted that this step is not necessary, because the event already provides that token automatically.
- Click the “Load original entity” task. You’ll see some icons appear to the right of it. Click the rounded rectangle “Append task” icon, which inserts another task.
- Label the task “Load new values”.
- In the “Template” section, Click the “Select” button and choose “Entity: load”.
- In the “Custom properties” section, change the “Name of token” field to
updatedentity. Once again, we’ll be referencing this later, so watch for typos! - Near the bottom, we do not modify the “Load unchanged values” dropdown.
5. Create conditional to only proceed to “Load new values” if the acceptance field is empty
We only want to send an email if the acceptance field has not yet been set, this will prevent emails from going out if we update other fields. To do this, we create a conditional.
- Select on the arrow that goes from the “Load original entity” task to the “Load new values” task. This will bring a “Sequence flow” property pane to the right.
- In the “Template” section, Click the “Select” button and choose “Entity: field value is empty”.
- Label the condition, “Check if acceptance is empty”.
- Within the “Field name” field, enter the machine name of the field you want to check. For FLDC it’s
field_acceptance. - Within the “Entity” field, we enter in the token that we created for the original entity’s values,
originalentity. Once again, no typos!
6. Append task: “Send acceptance email”
The next step is to create the task that will actually send the email!
- Click the “Load new values” task. You’ll see some icons appear to the right of it. Click the rounded rectangle “Append task” icon, which inserts another task.
- Label the task “Send acceptance email”.
- In the “Template” section, Click the “Select” button and choose “Send email”.
- Insert either an email address or a token representing an email address into the “Recipient email address” field. I use the
[node:author:mail]token to represent the author of the session node. Note that I can specify the previously created entity tokens here, but do not need to because this node token is taken from the event. - Fill out the “Subject” and “Message” fields. Note you can also use tokens here.
7. Create conditional to only proceed if the acceptance field is set to “Accepted”
Before we send the acceptance email, we obviously need to check that the field_acceptance field is set to “Accepted”. To do this, we need to check that the value is set to 46, which is the ID of the “Accepted” taxonomy term that I created.
- Select on the arrow that goes from the “Load new values” task to the “Send acceptance email” task. This will bring a “Sequence flow” property pane to the right.
- Label the condition, “Check if acceptance is is accepted”.
- In the “Template” section, Click the “Select” button and choose “Entity: compare field value”.
- Within the “Field name” field, enter the machine name of the field you want to check. For us it’s
field_acceptance. - For the “Expected field value” field, set the value to the value you’re expecting. For FLDC, we’re expecting
46, which is the ID of the “Accepted” taxonomy term that we created. - Within the “Entity” field, we enter in the token that we created for the original entity’s values,
updatedentity. Be sure no typos!
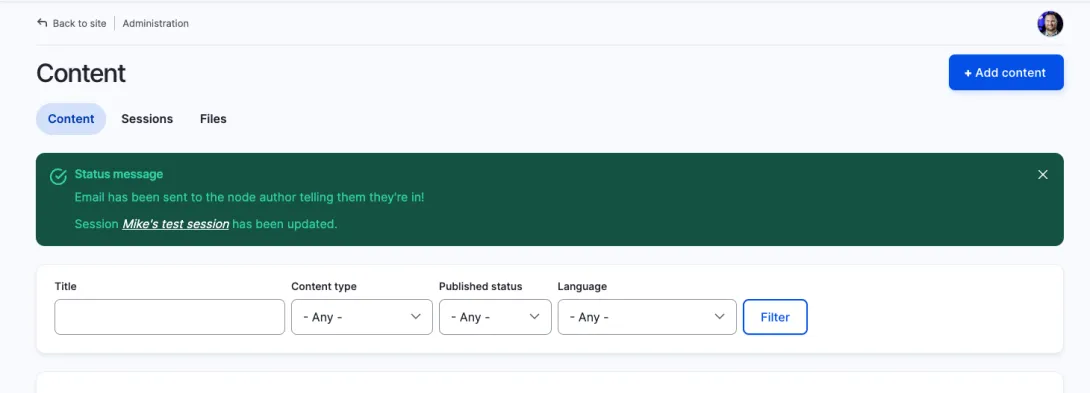
8. Append a new task to show “Emails sent” message to the user
After the emails are sent, we want to let the admin know that action happened. To do this we display a message.
- Click the “Send acceptance email” task. You’ll see some icons appear to the right of it. Click the rounded rectangle “Append task” icon, which inserts another task.
- Label the task “Display message to user”.
- In the “Template” section, Click the “Select” button and choose “Display a message to user”.
- Within the “Message” field, Enter the message that you want to display.
9. Create alternate workflow to send rejection emails and show message
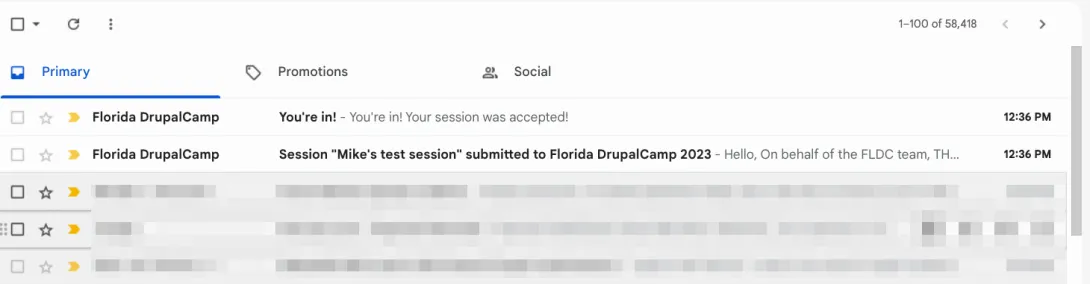
The “Accepted” emails are now going out!
Let's do this again for rejection emails by replicating steps 6-8.
- Same as before, we click the “Load new values” task. You’ll see some icons appear to the right of it. Click the rounded rectangle “Append task” icon, which inserts another task.
- Label the task “Send rejection email”.
- With your mouse, grab the starting point of the arrow that is splitting off from the “Check if acceptance is accepted” arrow. Drag it to the bottom of the “Load new values” task.
- Select the “Send rejection email” task that you just created.
- In the “Template” section, Click the “Select” button and choose “Send email”
- Insert either an email address or a token representing an email address into the “Recipient email address” field. I use the
[node:author:mail]token to represent the author of the session node. - Fill out the “Subject” and “Message” fields. Note you can also use tokens here.
- Select the arrow that goes from the “Load new values” task to the “Send rejection email” task. This will bring a “Sequence flow” property pane to the right.
- Label the condition, “Check if acceptance is is rejected”
- In the “Template” section, Click the “Select” button and choose “Entity: compare field value”
- Within the “Field name” field, enter the machine name of the field you want to check. For us it’s
field_acceptance. - For the “Expected field value” field, set the value to the value you’re expecting. We’re expecting
47, which is the ID of the “Rejected” taxonomy term that we created. - Once again, within the “Entity” field, we enter in the token that we created for the original entity’s values,
updatedentity. - Click the “Send rejection email” task. You’ll see some icons appear to the right of it. Click the rounded rectangle “Append task” icon, which inserts another task.
- Label the task “Display message to user”
- In the “Template” section, Click the “Select” button and choose “Display a message to user”
- Within the “Message” field, Enter the message that you want to display.
We’re done!
And with that, we have a completely functional system to send transactional emails without any custom code!
As you’ve seen, barely scratching the surface of what the ECA module can do. But hopefully with this tutorial, you can see how its interface works, and imagine the possibilities!
Hey you! Leave a comment!4
Seriously... I really like it when people let me know their thoughts and that they've read this.
Hi - a really helpful article that helped me understand the flexibility of the ECA. In my case, i have a content type which uses paragraphs which in turn has a date field. how do i access the author email if i need to email on changes to the date field on update. the tokens for the [node:author:mail] do not seem to result in getting the email id. In my case, event is the update content entity (paragraph)
Hello! Didn't get a chance to hang at Pittsburgh, but I met you at Portland. Hope all is well! Had a quick question for you related to this walkthrough. I am new to eca, so getting the hang of it. I need to simply compare the orig value to the new value of one field. When I tried "field value has changed" condition, eca still sent emails even though I did not change that specific field. I was trying to use the method above as well by loading the orig entity and then loading the new (changed) entity before save. Where I am having trouble is comparing a specific field between the two entities. So, in your example, your expected value is 46. My expected value needs to be the field value of the orig so I can see if it has changed or not. Hope that makes sense. Just looking for some help! Thanks!
NM! Finally got it. I ended up loading original data, loading new data, then adding a "compare two scalar values. Each value was a token from orig or new entities that I loaded. Then I was finally able to compare the two. Still odd to me that the "field value has changed" option doesn't work for an individual field change. When I was testing with that conditional, it was always triggered even if that field did not change.
Great playback demo, that really helps.